
Baby Positions
It is helpful to know the position of a baby near the end of pregnancy because optimal fetal positioning can reduce the length of labor and pushing and increase the comfort of the mother. Yoga and movement can help babies achieve this optimal positioning especially if the mother knows the position of the baby before labor begins. In this next section we will discuss basic baby positions (there are many variations of these positions but these are the ones you are most likely to hear about from students) and movements that assist in correcting less than optimal positioning. Remember that babies have plenty of room to move around prior to about 34 weeks so positioning can change often prior to that.

Prenatal Vinyasa Yoga Photo Gallery
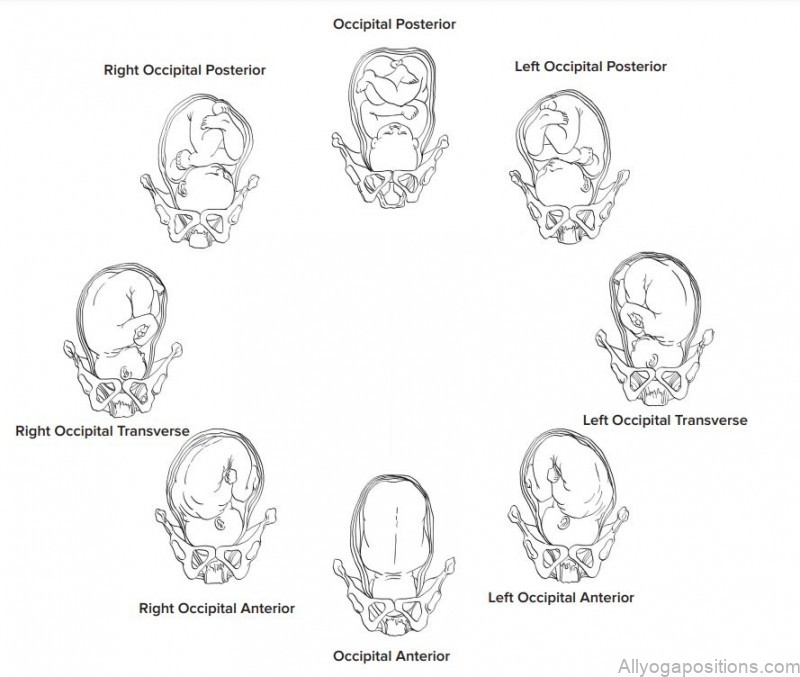
What is the optimal fetal position?
The optimal fetal position is a head down position called Occipital Anterior, often referred to as OA. Left Occipital Anterior or LOA is also an optimal position for babies at the onset of labor. In the OA presentation the baby is head down and the face is against the mother’s spine and the back of the head, the occipital bone, is facing the mother’s front. This position is optimal for a number of reasons, the baby’s head molds as it moves through the birth canal and in this position the molding happens more easily; labor with an OA baby is typically shorter and less painful than other positions.
Keeping a baby in an OA position:
• Keeping the womb symmetrical and stable using movement and gravity as well as short inversions to relax the uterine ligaments keeping each side of the uterus symmetrical.
• Once womb is symmetrical then do pelvic tilts while baby is active to assist in positioning and release tension Occipital Posterior The Occipital Posterior or OP position is also a head down presentation only the back of the head is against the mother’s back.
This position is less favorable for baby and mother. It is more likely that this position can result in the mother having back labor (feeling the contractions in her back as back pain.) OP babies take longer to maneuver through the birth canal and can lengthen the time of labor and pushing. It is sometimes difficult for health care providers to know what position the baby’s head is in. They can usually tell if a baby is in a head down position but the rotation of the head is more likely found by where the mother is feeling kicks and bulges. With the help of contractions and mother’s movement OP babies can turn in labor to a more favorable position, babies can be born in this position as well especially if the mother has an adequate pelvic outlet for baby to pass through. 30% of babies start labor in an OP position, but only 3% are born that way.
Helping to turn an OP baby:
• Inversions can be helpful to make the pelvic floor more symmetrical
• Rebozo Sifting
• Side lunges
• Pelvic Floor release
• Sacral release
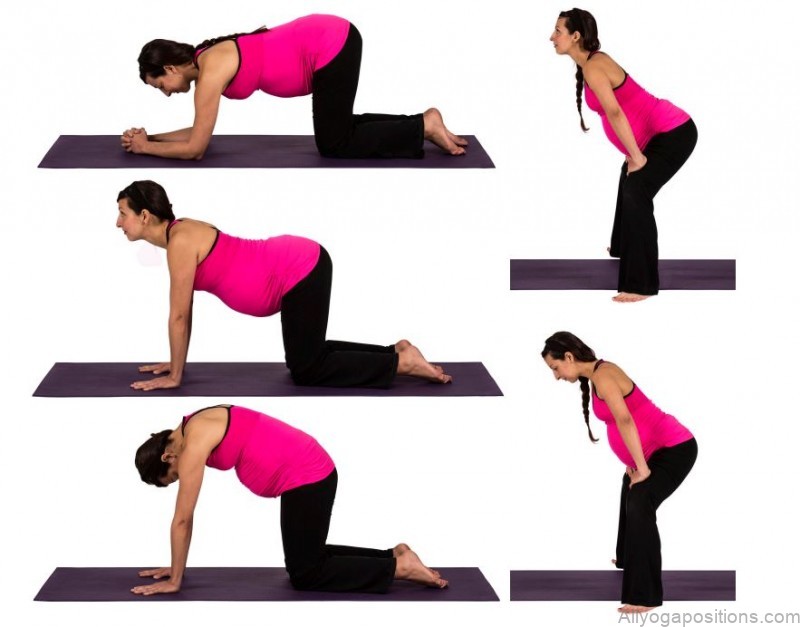
• Cat Cow can help a head rotate to a position that is more favorable; however this
is more likely to be effective if the woman is already in labor or the baby is active
while performing these movements
• Sometimes a child’s pose with elevated hips and pelvic tilts can be helpful once
labor has begun if there are signs baby is OP
• Forward leaning positions encourage the heaviest part of baby (the back and back
of the head) toward the front of the mother’s body

Breech & Transverse Babies

A Breech baby is a baby who is presenting with the bottom down and head up. Many doctors are uncomfortable delivering breech babies and will automatically do a cesarean if a baby is breech. There are several different kinds of breech presentations.
- Frank Breech: A Frank Breech baby is a baby who is “sitting” in the pelvis with the bottom down and the feet up by the head. This is the most favorable for vaginal delivery though there are still many health care providers who will not do vaginal delivery of a Frank Breech baby.
- Complete Breech: A Complete breech baby is one who is “sitting” cross-legged in the pelvis with the head up and legs and bottom down. Most health care providers will want to do a cesarean with this kind of presentation.
- Footling Breech: A Footling breech is the same as a complete breech with the exception of one leg hanging lower than the other. Very few people attempt a vaginal delivery with this kind of presentation. Transverse babies: A Transverse baby lies sideways in the uterus and is not deliverable vaginally. Positions and techniques for turning breech babies:
- Forward Leaning Inversion is similar to downward dog but the angle is a bit more drastic. This can be done on a couch or bench with elbows on the ground or on the stairs (both require supervision) and should be done for about 30 seconds and followed by the breech tilt.
- The breech tilt: Moving into a bridge position with support under the hips and legs up the wall. This can be further helped by using a cold compress near the baby’s head to encourage rotation away from the cold. This will not be particularly comfortable for the mother and baby might move around a bit. Visualization of the baby turning is also very helpful during this inversion.
- Pinky toe pressure point: The outside of the pinky toe is a pressure point that helps stimulate babies to turn from breech to a head down position. Acupuncturists often use this point along with Moxibustion.
- Chiropractic can be very effective in turning breech babies • Many health care providers also offer a technique called an external cephalic version. Done at around 37 weeks, this procedure is done by a health care provider by physically turning the baby from the outside of the body. It is recommended to try all other techniques before doing this one as it holds the greatest risk.
Signs of Labor
Possible Signs
• Backache
• Menstrual Like Cramps
• Soft Bowel Movements/Diarrhea
Preliminary Signs
• Non-progressing contractions
• Bloody show – blood tinged mucus
• Leaking of Amniotic fluid
Positive Signs
• Progressing contractions: longer, stronger and closer together
• Spontaneous rupture of membranes
• Dilation of cervix – only assessed through vaginal exams
Stages & Phases of Labor
Stage 1: Labor
Early Labor
Cervix
• Moves forward from a posterior position
• Begins or continues to soften
• Begins to efface (thin)
• Dilation from closed to 3 or 4 cm (6cm)
Contractions
• Irregular
• Increasingly stronger and longer
• Intensify with movement (i.e. walking)
• Do not go away after resting or shower
• Range: 5-30 minutes
• Duration: 30-45 seconds
Emotions
• Euphoric, happy, elated
• Anticipatory
• Possible anxiety/nervous that ‘this is it’
Physical
• Abdominal cramping
• Possible back pain
Active Labor
Cervix
• Cervix is soft & very well effaced
• Dilation from 4 (6) to 8 cm
• Begins to trickle blood as the cervix dilates
Contractions
• Regular and more intense
• Require woman’s concentration
• Range: 3-5 minutes
• Duration: 45-75 seconds
Emotions
• Waning enthusiasm
• Inward focus
• Broad spectrum of emotions
Physical
• Abdominal cramping
• Possible nausea
• Pelvic and rectal pressure
Late Labor (Transition)
Cervix
• Dilation to 10cm
• Dilation may be uneven and leave a lip or rim
• Continues to trickle blood
Contractions
• More intense
• May be double peaked
• Range: 2-3 minutes
• Duration: 90-120 seconds
Emotions
• “Fight or Flight” response kicks in
• Extremely focused
Physical
• Shaking can occur
• Possible nausea
• Rectal pressure / urge to push
Stage 2: Birth
Latent (resting) Phase
• Cervix is almost completely dilated
• Continued rectal pressure
• Woman becomes quiet and begins to relax between contractions
Descent
Mother
• Cervix completely dilated
• Involuntary urge to push
• Perineal massage or warm compress to minimize vaginal trauma
• Bearing down (pushing) becomes more focused
• Bear down spontaneously to allow slow opening of vagina
• Intervals of 10 seconds to push followed by rest
• Relax pelvic floor & bulge perineum
Baby
• Descends to a +1 or +2 station
• Head rotates as it progresses through the birth canal
• With each push, head moves forward 2 steps and retracts 1
Transition (to birth)
Mother
• May become more vocal
• Contractions strong and powerful
• “Ring of Fire”
• Burning sensation in the perineum caused by the stretching of the soft tissues
• Felt when baby’s head is crowning
• Lasts a very short time
Baby
• Presenting part is on the perineum
• Head moves to a +3 station
• At +3 station, baby’s head emerges from birth canal to +4 station (birth)
• Doctor or midwife may suction nose and mouth as head emerges
• Cord continues to pulsate once body is birthed
Stage 3: After Birth
Delivery of Placenta
Mother
• Pitocin may be administrated for placenta delivery
• Usually delivered within 20 minutes of birth
• Must be delivered within one hour of birth
• Placenta examined by practitioner to make sure it is complete
Newborn
• Apgar score
• Good condition range from 7-10
• Requires medical attention is under 6
• Performed twice at 1 minute and at 5 minutes after birth and at 10/15/20 minutes if
the 1 and 5 minute APGARs are low.
Stage 4: Recovery
Mother
• Practitioner will examine perineum and repair tears with dissolvable stitches
• First breastfeeding occurs – baby’s suckling helps with uterine involution
• Ice packs are applied to perineum to minimize swelling
• Nurse will massage fundus to assess uterus condition and assist with involution
Newborn
• Vitamin K injection (or oral drops) given to assist with blood clotting
• Antibiotic eye ointment is administered
• Blood test (PKU)
• First Hep B shot if agreed to by parents
• bathing baby – unless parents request not to bathe
Table of Contents
Maybe You Like Them Too
- Skull Shining Breath A Yoga Pose for Clearing the Mind and Opening the Heart
- Yoga for Better Sleep 7 Relaxing Poses to Help You Fall Asleep
- Twisted Head-to-Knee Pose A Guide to Parivrtta Janu Sirsasana
- Yoga for Writers Find Your Flow and Unblock Your Creativity
- Yoga for Intuition 5 Ways to Tune into Your Inner Wisdom