
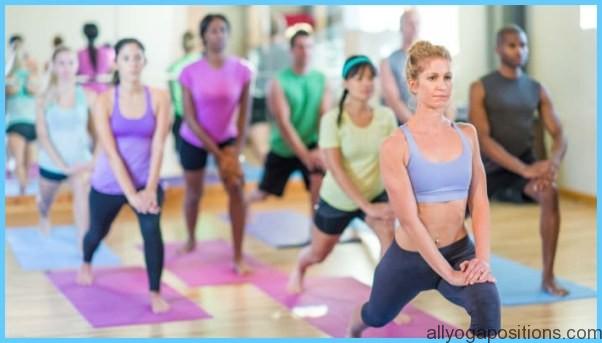
Welcome to Turin yoga welcome to Vanessa thanks for joining us today we’re gonna look at hands on adjustments what are they good for what do we do with them and a little bit about how to use them for those of you teachers or people that actually help other people say the first and most important reason is safety, if somebody is knee is kind of in a wrong place where they’re about to injure themselves that’s the first thing you go you don’t go and try to get them deeper into the pose when they’re basically meant for safety is not right safety first the second thing is maybe we want to align something else just. So It looks right feels right so they’re getting more of the energetic full pose. And then we can start to take them a little deeper we can actually deepen them. And it feels good places that maybe they’re not aware of maybe they can’t do on their own those are usually the ones that we like. Because they feel great.
How to Give Great Hands on Assists Adjustments Yoga Teachers Photo Gallery


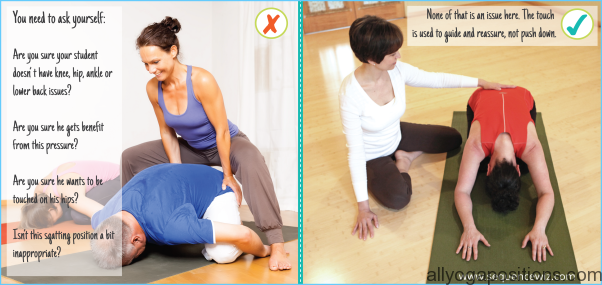

But with caution of course just when I’m touching I’m sharing my love right now my care my connectedness my presence with Vanessa and maybe Vanessa when she’s doing downward dog is thinking about something else I know she’s enlightened and she doesn’t. But just in case she was sometimes it happens to me right the teacher puts their hand on me they barely do anything. But I just come right to that present moment so there’s just that element of bringing us here now to this moment to the practice of yoga I’m a guy pretty obvious which means that I’m a little more careful with my hands on adjustments when I’m putting my hand on somebody I can place the hand like this on the knee no problem. But in many instances I’m using more the heel of the hand and I don’t use my fingers some the fingers start to feel a little bit more intimate when I’ve had those lovely adjustments I love them right. But they start to be a little cutesy and maybe, if you’re a girl you can get away with that I like to use the heel of the hand the other thing is the intention really matters, if I’m just placing the hand there. And the person has no idea why it may start to feel awkward weird but, if they’re feeling like I’m taking their shoulder back there’s no doubt even, if my hand could seem appropriate or inappropriate there’s no doubt that my intention was to help them and to get it in the better position and. So, if you do hands-on adjustments make sure you know why you’re doing it don’t just jump on to somebody and say oh cool I learned hands on adjustments I’m going to touch them really make sure you know exactly what you’re looking for what you’re doing which means the cats on adjustments a lot of it is about observing looking at the person seeing what you see is safety first. And then from that place starting to work on safety alignment and deepening them a little bit put the downward dog for a second.
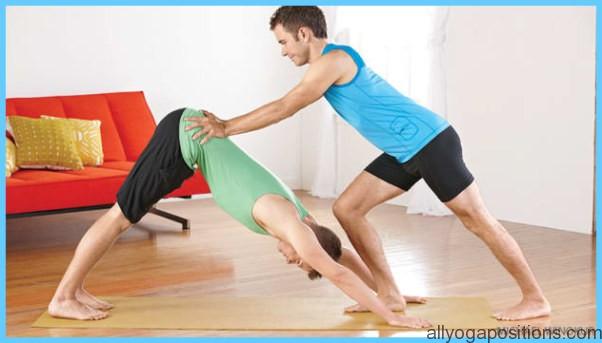
And then we look at maybe a twist and a seated forward fold and even a revolve quoc triangles we’ll get a few different variations of them just to get an idea. So let’s try a downward dog how about your hand spacing this way and generally downward dog some of the things that we see and sometimes the fingers are lifted here the moms are limited. And you just have to press down and remind them to ring down for many the shoulders wrap in. And then I’m going to reach in and wrap the shoulders to externally rotate them to create space so again it’s a pretty firm to touch. But even though it’s firm I’m definitely not harming I’m just letting her know I know what I’m doing. But it’s showing her exactly the direction, if the students and a lot of times they will they’ll collapse in the chest maybe you need to pull them out a little bit the classic and feel good adjustment after you’ve taken care of their shoulders, if they got their legs pretty straight I’m gonna find kind of where the arches in the back. And I’m from that place gonna not press her down. But rather up right. So I’m pressing kind of trying to help her create length in the spine she should feel a little less pressure on the wrist what’s that feeling me you didn’t hear she said great she’s probably just being nice.
But kidding. So we’re trying to really reach the hips up I can use my arms some people like to use full body weight some people are uncomfortable with that make sure that whatever you do with your hands aren’t adjustments you’re feeling fine right so don’t go doing it in your spine collapse make sure you’re tall you have a good posture when you’re doing that since you’re there why don’t we come up and do the revolved triangles so for many people the problem is the hips start to roll in the shoulder rolls in again Vanessa has it kind of perfect so less to do make sure they feel supported. So In this case before I start pulling yacking or doing anything I’m going to make sure that I am supporting her. So I’m gonna go since I’m gonna pull her shoulder I’m gonna actually support her lower shoulder nice I’m gonna stand in a way that now she, if she has to fall I got her right she falls on me, if she falls the other way my hand is there I can now reach through her shoulder and to her lower back and help lengthen the lower back bring the hips back to square while at the same time opening the shoulder you can’t see it. But she’s smiling right now. And it really should feel like a nice opening you can adjust the hand, if you want you can use your head, if you need to put hands on the chest. And then before I let her go I make sure she’s stabilized I start to move my leg away. But still here. And then she can come up I don’t just walk away there’s nothing more embarrassing than falling after the teacher gave you a hands on adjustment.
And it’s not necessarily your fault do you want to see the other side she’s got the long spine her hips are square. But either way right I’m supporting her and for some this is not comfortable some of us will want to stand really facing her I just like to have the side of my leg versus the front of my body touching. And then again I’m lengthening here you can even again I can bring the chin in a little bit into her adjustment, if that feels good really think about the students they’re your most important asset right now. And then the reason I like to put my leg behind the shoulder and not the lower back is. So that it doesn’t create too much of an arch in the lower. And then from here again as I start to release I’m just moving the leg a tiny bit let her find balance. And then she’ll come up let’s have a see so one more thing when we’re doing standing poses is that sometimes when we’re going next to the body we’re so afraid that they’ll fall that we actually start to push them away and they follow the other way so make sure you start just a tiny bit away from their body.
So that as you start to deepen their practice they can come. And come and almost like lean on you don’t let them fall the other way either just. Because you’re overly supported we look at a twist to see the twist similar to what we did standing on the crystal like your back is twisting the most important part is to lengthen the spine right and that’s the part that’s usually hard there’s many variations you can use your legs to anchor them down, if we find that their hip is lifting every hands-on adjustment is different. And you have to do it using a lot of observation first read their body before you go most things look great I feel like I could help lengthen. And then deepen everything else looks pretty safe help her lengthen by going underneath her shoulder blade. And I’m going to lift up. And then I’m going to use my other arm and help her twist deepen the thing is that I’m also making sure I’m comfortable and tall. So I’m not collapsing and I try to breathe together with the person I’m working with. So we’ll both try to inhale and lengthen.
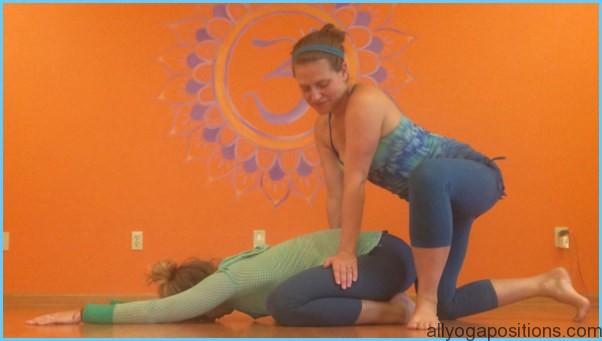
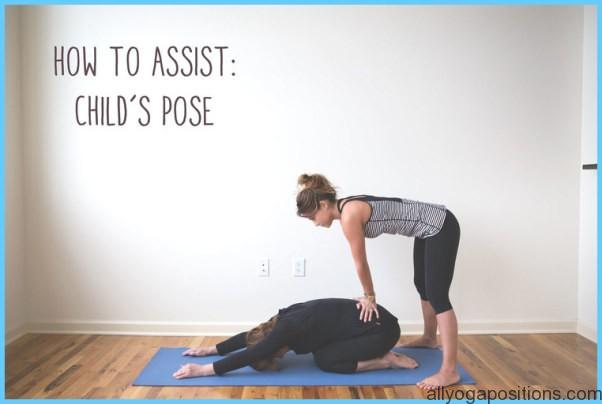
And then Lobos deep into twist right she can even go here for the deeper variation taking the arm into her leg or taking a bind and in this case what I would do is I would use my arm against hers to help lengthen. And then deepen the bind creating the length and deepening the bind let’s try it from a different angle we’ll try to do the other side to this witch legs wherever you are and sometimes we need to help them get into the pose even here like with the yarn in this case there’s no need it’s really more about the simple basic lengthening and opening I’m underneath your shoulder blades lengthening. And I’m using this aren t open trying to keep my fingers off of her. But even, if they were holding the shoulder no big deal, if we wanted to go for the deeper one she can take the bind or she could reach just the inner thigh again I’m lengthening and deepening I’ve had times where I’ve helped here the hip go down whatever it may be right thank you one last one we’ll try to do the seated forward fold. So we’re going to take paschimottan Asana she’s gonna stay like this with it back to me as she left then she’s gonna slowly start to come forward down into her pose the secret is again just like downward dog we’re not looking to smash her down. But rather to create length to create space for the spine we want to grow deeper in our practice. But we also really want to make sure that we’re doing it in a safe healthy way. So Instead of smashing down here which would just create this arch I’m going to start from the lower back.
And I’m going to create then from almost helping the hips rotate forward pelvic rotation forward creating length with my thumbs. And I’m finding where the arch is kind of beginning and that’s where I’m staying. So I’m staying here where in case the student is pretty flexible you can add more weight, if you want your body. But again depending on your weights and their weight right you’re very light and they’re bigger sure use your body, if they’re very gentle delicate. And you’re a big person then use less of your weight she already lengthened her neck now see that she’s using into the PES you can amper them and make sure your their shoulders are relaxed just kind of give them a hint of the massage that’s beyond hands-on adjustments. But sharing the love is part of it right why not and that’s it just kind of staying with them that’s another last bit point many times I’ve seen in teacher trainings students come in they’re like oh great hands-on adjustments here find the right place give it for a second. And then they get up and leave the person let them feel like you’ve been with them. And also remember that it takes a few breaths for the person to get into the post to really release into your hands and both of you melting into the pose so work with them slowly adjust them. And then stay with them let them kind of find the post let them feel you. And when you’re releasing make sure it’s gentle it’s up so there’s no feeling of abandonment that’s really it there’s lots of lots of little details we’ve covered quite a bit obviously better to learn this from a teacher than just kind of on your own.
But these are some of the tools that hopefully help those of you already teaching already doing this have fun and do it with love really think about the person’s they present when you’re doing it. So that they don’t feel I can just place the hands. But we knowing what you’re doing back to the attention and thank you our namaste.