
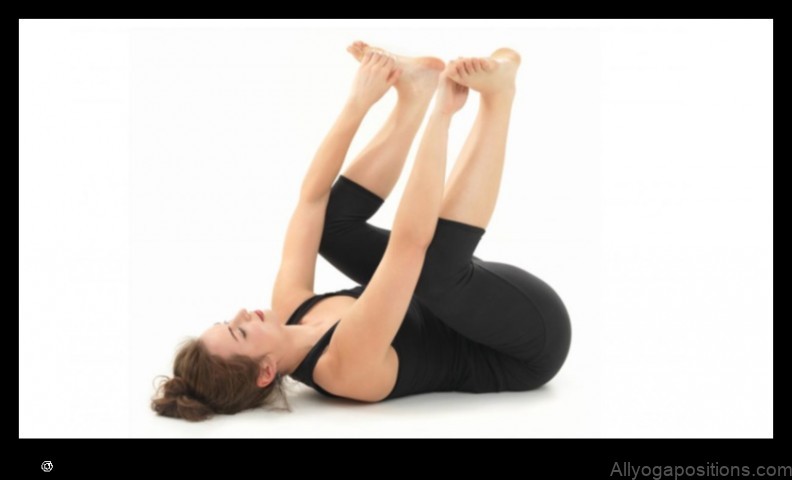
Happy Baby Pose (Ananda Balasana)
Happy Baby Pose (Ananda Balasana) is a beginner yoga pose that is often used for relaxation and stress relief. It is a gentle pose that can help to stretch the back, hips, and thighs.
Benefits of Happy Baby Pose
- Relieves stress and tension
- Improves flexibility in the back, hips, and thighs
- Reduces pain in the lower back
- Promotes deep relaxation
- Improves circulation
How to do Happy Baby Pose
- Start by sitting on the floor with your legs extended in front of you.
- Bend your knees and bring your feet towards your body.
- Grasp your ankles with your hands and pull your feet towards your chest.
- Allow your knees to fall open to the sides.
- Rest your head on the floor or a pillow.
- Hold the pose for 30 seconds to 1 minute.
- Release the pose and slowly come back to sitting.
Common Mistakes in Happy Baby Pose
- Not opening your knees wide enough.
- Not pulling your feet close enough to your chest.
- Rounding your back.
- Holding the pose for too long.
Modifications for Happy Baby Pose
- If you have tight hamstrings, you can bend your knees and place your feet flat on the floor.
- If you have pain in your lower back, you can place a pillow under your head or knees.
- If you are pregnant, you can keep your knees together and place your feet on the floor in front of you.
Precautions for Happy Baby Pose
- Do not do this pose if you have any injuries to your back, hips, or knees.
- Be careful not to overstretch your hamstrings.
- If you feel pain in any part of your body, stop the pose and rest.
When to Avoid Happy Baby Pose
- If you have any injuries to your back, hips, or knees.
- If you are pregnant.
- If you have high blood pressure.
History of Happy Baby Pose
Happy Baby Pose is a traditional yoga pose that is said to have originated in India. It is believed to have been used for centuries as a way to relax and relieve stress.
Variations of Happy Baby Pose
- Seated Happy Baby Pose: This variation is done by sitting on your knees with your feet flat on the floor. Bring your feet together and place your hands on your ankles. Lean forward and rest your head on your knees.
- Standing Happy Baby Pose: This variation is done by standing with your feet shoulder-width apart. Bend over and place your hands on your ankles. Allow your knees to fall open to the sides. Rest your head on the floor or a pillow.
- Supine Happy Baby Pose: This variation is done by lying on your back with your knees bent and feet flat on the floor. Bring your feet towards your body and place your hands on your ankles. Allow your knees to fall open to the sides. Rest your head on the floor or a pillow.
FAQ
- Q: What are the benefits of Happy Baby Pose?
- A: Happy Baby Pose can help to relieve stress and tension, improve flexibility in the back, hips, and thighs, reduce pain in the lower back, promote deep relaxation, and improve circulation.
- Q: How do I do Happy Baby Pose?
- A: To do Happy Baby Pose,
Topic Answer What is Happy Baby Pose? Ananda Balasana, also known as Happy Baby Pose, is a beginner-friendly yoga pose that is often used to relieve stress and tension. Benefits of Happy Baby Pose - Relieves stress and tension
- Improves flexibility
- Reduces pain
- Increases circulation
- Promotes relaxation
How to do Happy Baby Pose - Start by sitting on your mat with your legs extended in front of you.
- Bend your knees and bring your feet towards your hips.
- Grasp your ankles with your hands and gently pull your feet towards your chest.
- Allow your knees to fall open to the sides.
- Rest your head on the floor or on a pillow.
- Hold the pose for 30 seconds to 1 minute.
- Release the pose and slowly return to sitting.
Common Mistakes in Happy Baby Pose - Not keeping your back flat
- Overstretching your hamstrings
- Pulling on your ankles too hard
- Holding the pose for too long
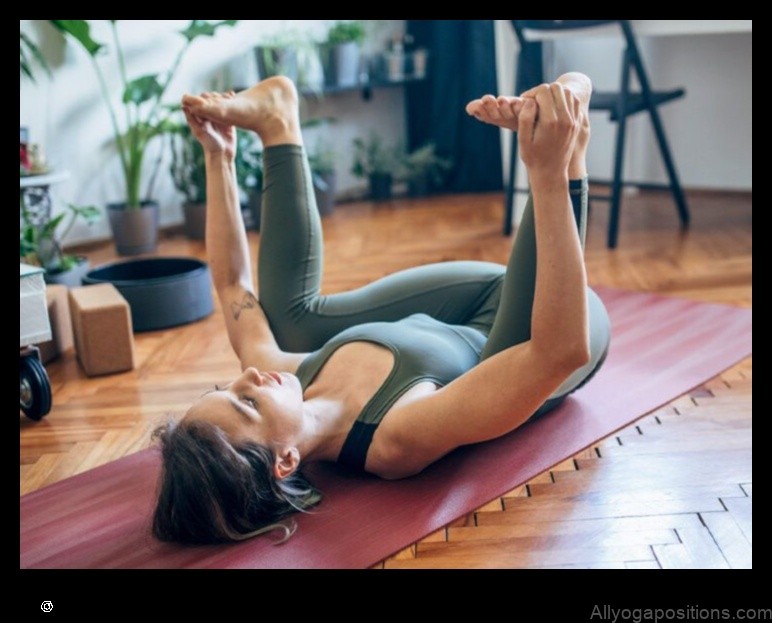
What is Happy Baby Pose?
Happy Baby Pose (Ananda Balasana) is a beginner-friendly yoga pose that is often used as a relaxation pose. It is a great way to relieve stress and tension in the lower back, hips, and shoulders.
How to do Happy Baby Pose
To do Happy Baby Pose, follow these steps:
- Lie on your back with your knees bent and your feet flat on the floor.
- Bring your feet together and allow your knees to fall open to the sides.
- Reach your arms behind your back and grab your ankles.
- Inhale and lift your knees up towards your chest, keeping your feet together.
- Exhale and lower your knees back down to the floor.
- Repeat this step for 5-10 breaths.
IV. Common Mistakes in Happy Baby Pose
There are a few common mistakes that people make when doing Happy Baby Pose. These mistakes can make the pose less effective and can even lead to injury.
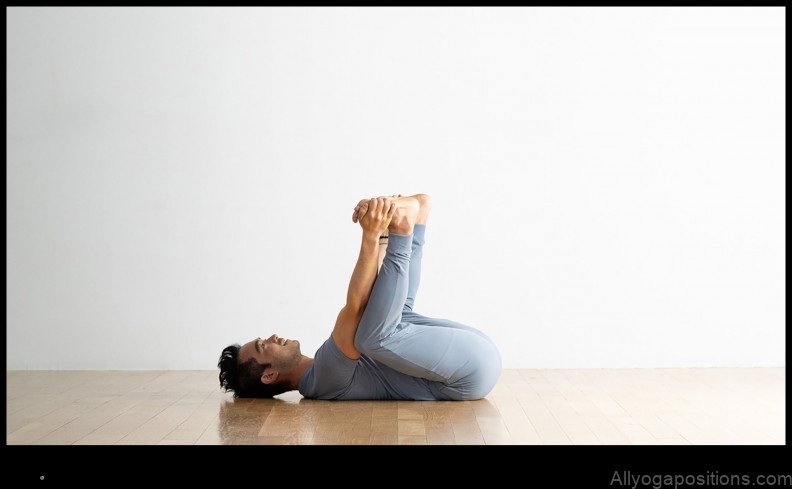
- Not lifting your hips high enough. When you’re in Happy Baby Pose, your hips should be lifted as high as possible so that your knees are in line with your shoulders. This will help to stretch your hamstrings and open up your hips.
- Rounding your back. It’s important to keep your back straight in Happy Baby Pose. Rounding your back can put strain on your spine and make the pose less effective.
- Pressing your knees together. Your knees should be slightly apart in Happy Baby Pose. Pressing your knees together can restrict your hip flexors and make the pose less effective.
- Holding the pose for too long. Happy Baby Pose is a relaxing pose, but it’s important not to hold it for too long. Holding the pose for too long can lead to fatigue and discomfort.
If you’re experiencing any pain or discomfort in Happy Baby Pose, stop the pose and consult with a qualified yoga instructor.
V. Modifications for Happy Baby Pose
There are a few modifications that can be made to Happy Baby Pose to make it more accessible for people of all levels of flexibility.
- For people with tight hips, you can place a rolled-up blanket or yoga block under your thighs to help you open up your hips more.
- If you have lower back pain, you can keep your knees bent and your feet flat on the floor.
- If you have shoulder pain, you can bring your arms out to the sides instead of overhead.
You can also experiment with different variations of Happy Baby Pose to find what feels best for you. Some variations include:
- Crossing your ankles behind your back
- Reaching your arms behind you and clasping your hands behind your back
- Bringing your knees to your chest and wrapping your arms around your shins
VI. Precautions for Happy Baby Pose
There are a few precautions to take when practicing Happy Baby Pose. These include:
- If you have any pain in your lower back, hips, or knees, you should avoid this pose or modify it as needed.
- If you have a history of sciatica, you should avoid this pose or modify it as needed.
- If you are pregnant, you should avoid this pose or modify it as needed.
It is always best to consult with a doctor or other healthcare professional before starting any new yoga practice.
VII. When to Avoid Happy Baby Pose
You should avoid Happy Baby Pose if you have any of the following conditions:
- Lower back pain
- Sciatica
- Pregnancy (after the first trimester)
- Injury to the knees, ankles, or hips
If you have any concerns about whether or not you should do Happy Baby Pose, talk to your doctor or a qualified yoga instructor.
History of Happy Baby Pose
Happy Baby Pose is a yoga pose that is believed to have originated in India. It is said to be a gentle pose that can help to relax the body and mind. The pose is also said to be beneficial for relieving stress and anxiety.
Happy Baby Pose is a relatively simple pose to perform. It is a good pose for beginners and for those who are looking for a gentle way to stretch and relax.
If you are experiencing any pain or discomfort while performing Happy Baby Pose, stop and consult with your doctor or a qualified yoga instructor.
IX. Variations of Happy Baby Pose
There are a few variations of Happy Baby Pose that you can try to find a position that is more comfortable for you.
-
For a deeper stretch, extend your legs out to the sides as much as you can.
-
If your lower back is tight, place a rolled-up towel or blanket under your pelvis to support your back.
-
To relieve pressure on your knees, bend your knees and bring your feet closer to your body.
-
If you have neck pain, rest your head on a pillow or folded blanket.
You can also try combining Happy Baby Pose with other poses to create a more challenging or relaxing sequence.
-
From Happy Baby Pose, extend your legs up to the sky and reach for your toes.
-
From Happy Baby Pose, lower your legs to the floor and bring your knees to your chest.
-
From Happy Baby Pose, roll over onto your back and extend your legs out in front of you.
Experiment with different variations of Happy Baby Pose to find a position that is comfortable and beneficial for you.
FAQ
Q: What is Happy Baby Pose?
A: Happy Baby Pose is a yoga pose that is also known as Ananda Balasana. It is a gentle pose that is often used for relaxation and stress relief.Q: What are the benefits of Happy Baby Pose?
A: The benefits of Happy Baby Pose include:* Increased flexibility in the hips and lower back
* Improved circulation
* Reduced stress and anxiety
* Enhanced relaxation
* Improved sleepQ: How to do Happy Baby Pose?
A: To do Happy Baby Pose, follow these steps:1. Start by sitting on the floor with your legs extended in front of you.
2. Bend your knees and bring your feet to rest on the floor outside of your hips.
3. Reach down and grab your ankles with your hands.
4. Inhale and gently pull your knees towards your chest.
5. Exhale and release your legs back to the floor.
6. Repeat steps 3-5 for 5-10 repetitions.Table of Contents
Maybe You Like Them Too
- Tranquil Touchpoints Yoga for Inner ConnectionA gentle yoga practice to help you find peace and balance in your mind, body, and spirit.
- Yoga for Rehabilitation A Holistic Approach to Healing the Body
- Tolasana Yoga Pose A Guide to This Inverted Backbend
- Yoga for PTSD Recovery A Mindful Way to Heal
- Tittibhasana Yoga Pose A Guide to This Inverted Arm Balance