Low Lunge Yoga Pose
The low lunge yoga pose is a standing forward bend that stretches the hamstrings, calves, and groin. It also strengthens the thighs, glutes, and core.

Benefits of the Low Lunge Position
The low lunge position offers a number of benefits, including:
- Stretches the hamstrings, calves, and groin
- Strengthens the thighs, glutes, and core
- Improves balance and coordination
- Reduces stress and anxiety
- Promotes relaxation
How to Perform the Low Lunge Position
To perform the low lunge position, follow these steps:
- Stand with your feet hip-width apart.
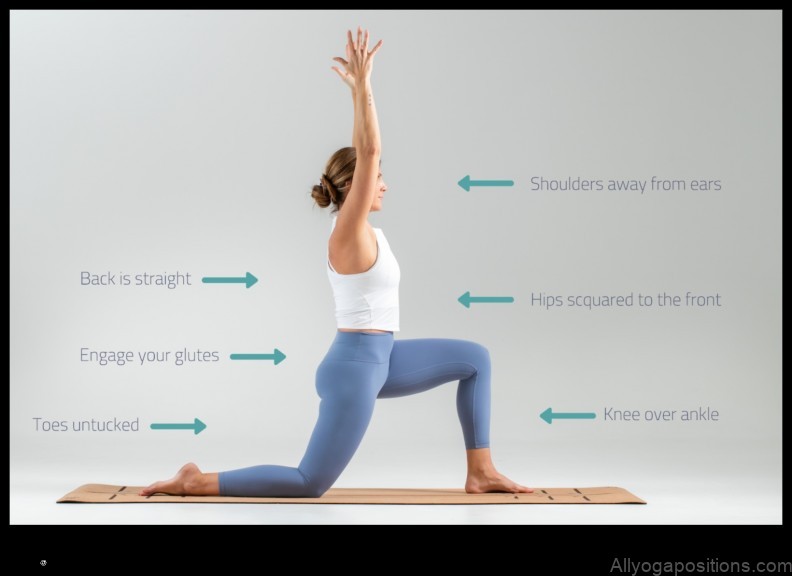
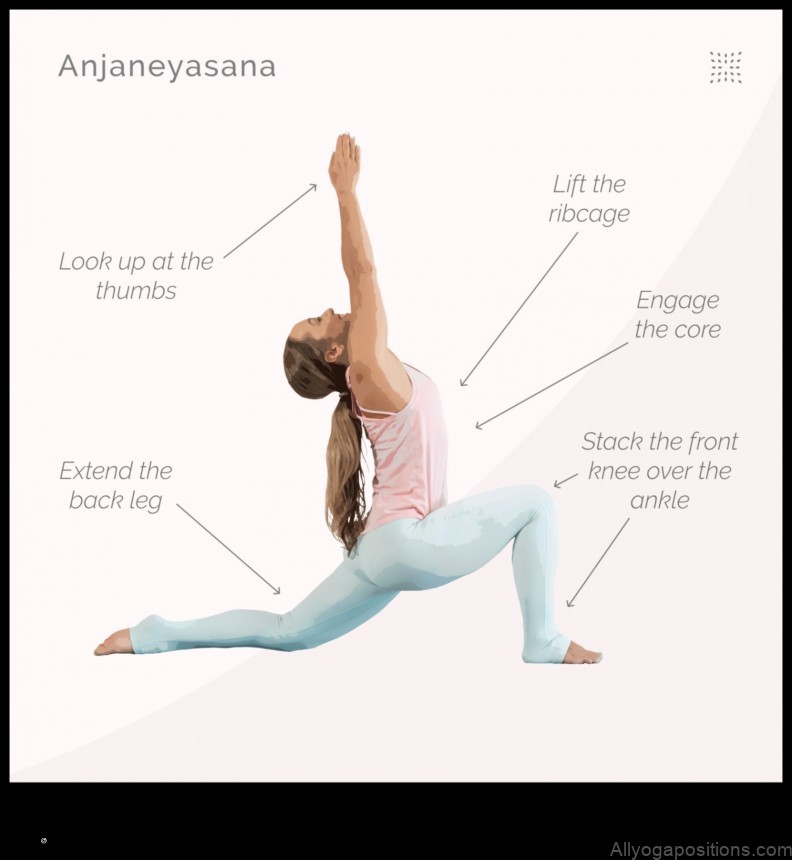
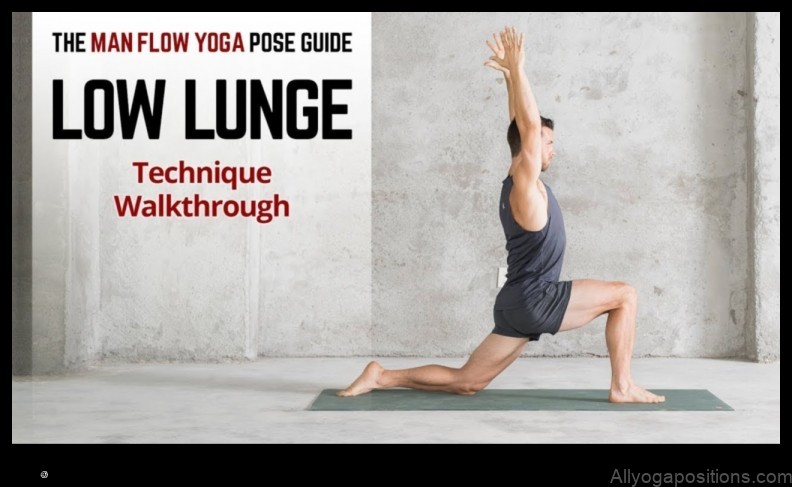
- Step forward with your right foot and lower your body until your left knee is bent 90 degrees and your right thigh is parallel to the floor.
- Reach your arms overhead and clasp your hands together.
- Hold the pose for 30 seconds to 1 minute, then return to standing.
- Repeat on the other side.

Common Mistakes to Avoid When Doing the Low Lunge Position
When doing the low lunge position, it is important to avoid the following mistakes:
- Rounding your back
- Allowing your knee to extend beyond your toes
- Pressing your head forward
- Holding the pose for too long
Variations of the Low Lunge Position
There are a number of variations of the low lunge position that you can try, including:
- Elevated Low Lunge: To perform the elevated low lunge, place a block or bench under your right foot. This will help to reduce the amount of strain on your knee.
- Wide-Angle Low Lunge: To perform the wide-angle low lunge, step your feet wider than hip-width apart. This will help to stretch your inner thighs and groin.
- Crossed-Leg Low Lunge: To perform the crossed-leg low lunge, step your right foot forward and cross your left leg over your right knee. This will help to stretch your hips and hamstrings.
Safety Tips for the Low Lunge Position
The low lunge position is a relatively safe pose, but there are a few things you can do to reduce your risk of injury:
- Listen to your body and stop if you feel pain.
- Start with a modified version of the pose and gradually work your way up to the full pose.
- Be aware of your alignment and avoid rounding your back or allowing your knee to extend beyond your toes.
When to Avoid the Low Lunge Position
The low lunge position should be avoided if you have any of the following conditions:
- Knee pain
- Hip pain
- Lower back pain
Conclusion
The low lunge yoga pose is a versatile pose that offers a number of benefits. It is a great way to stretch your hamstrings, calves, and groin, and it also strengthens your thighs, glutes, and core. If you are new to yoga, start with a modified version of the pose and gradually work your way up to the full pose. Be aware of your alignment and avoid rounding your back or allowing your knee to extend beyond your toes. If you have any pain, stop the pose and consult with your doctor.
FAQ
Q: What are the benefits of the low lunge position?
A: The low lunge position offers a number of benefits, including:
- Stretches the hamstrings, calves, and groin
- Strengthens the
Feature Low Lunge Yoga Pose Lunge Yoga Pose Yoga Lunge Pose Standing Forward Bend Forward Fold Also known as Anjaneyasana Anjalimudra Uttanasana Paschimottanasana Uttanasana Muscles targeted Quadriceps, hamstrings, calves, glutes, core Quadriceps, hamstrings, calves, glutes, core Quadriceps, hamstrings, calves, glutes, core Hamstrings, calves, glutes, back Hamstrings, calves, glutes, back Benefits Stretches hamstrings, calves, and glutes Stretches hamstrings, calves, and glutes Stretches hamstrings, calves, and glutes Relieves back pain Relieves back pain Contraindications Pregnancy, knee injuries Pregnancy, knee injuries Pregnancy, knee injuries Pregnancy, back injuries Pregnancy, back injuries Modifications Place a block under your heels Place a block under your heels Place a block under your heels Hold onto a chair or wall for support Hold onto a chair or wall for support II. Benefits of the Low Lunge Position
The low lunge position is a yoga pose that has a number of benefits for the body. These benefits include:
- Stretches the hamstrings, calves, and groin
- Strengthens the quadriceps, glutes, and core
- Improves balance and coordination
- Increases flexibility
- Reduces stress and anxiety
Benefits of the Low Lunge Position
IV. Common Mistakes to Avoid When Doing the Low Lunge Position
When doing the low lunge position, there are a few common mistakes that people make. Avoiding these mistakes can help you to get the most out of the pose and reduce your risk of injury.
Here are some of the most common mistakes to avoid when doing the low lunge position:
- Not bending your knees enough. When you do the low lunge position, your knees should be bent at a 90-degree angle. If your knees are not bent enough, you will put unnecessary stress on your knees and ankles.
- Rounding your back. When you do the low lunge position, your back should be straight. Rounding your back can put strain on your lower back and spine.
- Leaning too far forward. When you do the low lunge position, your torso should be parallel to the floor. Leaning too far forward can put strain on your lower back and hips.
- Holding the pose for too long. The low lunge position is a challenging pose, and it is important to listen to your body. If you feel pain or discomfort, you should come out of the pose.
By avoiding these common mistakes, you can get the most out of the low lunge position and reduce your risk of injury.
V. Variations of the Low Lunge Position
There are many variations of the low lunge position. Some of the most common variations include:
- Standing forward bend: In this variation, you start in the same position as the basic low lunge, but instead of bending your back knee, you keep both legs straight. You then bend forward from your hips, reaching your arms toward the ground.
- Seated forward bend: In this variation, you sit on the floor with your legs extended in front of you. Bend forward from your hips, reaching your arms toward your feet.
- Downward-facing dog: In this variation, you start in the high lunge position. Then, you step your back foot forward so that your feet are hip-width apart and your toes are pointed forward. Bend your knees and lower your body until your chest is on the ground and your arms are extended in front of you.
- Warrior I: In this variation, you start in the high lunge position. Then, step your back foot forward so that your feet are shoulder-width apart and your toes are pointed forward. Bend your front knee and raise your arms overhead.
- Warrior II: In this variation, you start in the high lunge position. Then, step your back foot forward so that your feet are wider than shoulder-width apart and your toes are pointed forward. Bend your front knee and raise your arms out to the sides at shoulder height.
VI. Safety Tips for the Low Lunge Position
When practicing the low lunge position, it is important to take precautions to avoid injury. Here are some safety tips:
- Start by practicing the pose on a mat or other soft surface.
- Listen to your body and do not push yourself beyond your limits.
- If you experience any pain, stop the pose and consult with a doctor.
- Be aware of your alignment and make sure that your knees are not over your toes.
- Do not hold the pose for too long.
VII. When to Avoid the Low Lunge Position
The low lunge position is a relatively safe pose for most people, but there are some instances when it should be avoided. These include:
* If you have any knee, hip, or ankle injuries, you should avoid doing the low lunge position until you have healed.
* If you are pregnant, you should avoid doing the low lunge position after the first trimester.
* If you have high blood pressure, you should avoid doing the low lunge position for an extended period of time.
* If you have any other medical conditions, you should talk to your doctor before doing the low lunge position.VIII. Conclusion
The Low Lunge position is a versatile yoga pose that can provide a variety of benefits for both beginners and experienced practitioners. It is a great way to stretch the hamstrings, calves, and groin, and it can also help to improve balance and flexibility. When done correctly, the Low Lunge position can be a safe and effective way to improve your overall health and well-being.
IX. FAQQ: What are the benefits of the low lunge position?
A: The low lunge position has a number of benefits, including:
- Stretches the hamstrings, calves, and groin
- Strengthens the quadriceps, glutes, and core
- Improves balance and coordination
- Reduces stress and anxiety
- Increases flexibility
Q: How do I perform the low lunge position?
A: To perform the low lunge position, follow these steps:
- Stand with your feet shoulder-width apart.
- Step forward with your right foot and lower your body until your left knee is bent 90 degrees and your right thigh is parallel to the floor.
- Extend your arms out in front of you, parallel to the floor.
- Hold the pose for 30 seconds to 1 minute, then return to standing.
- Repeat on the other side.
Q: What are some common mistakes to avoid when doing the low lunge position?
A: Some common mistakes to avoid when doing the low lunge position include:
- Rounding your back
- Overextending your knee
- Pressing your head down
- Holding the pose for too long
Q: What are some variations of the low lunge position?
A: There are a number of variations of the low lunge position, including:
- The forward fold lunge
- The cross-legged lunge
- The kneeling lunge
- The standing forward bend
Q: What safety tips should I keep in mind when doing the low lunge position?
A: When doing the low lunge position, it is important to keep the following safety tips in mind:
- Listen to your body and stop if you feel pain
- Start slowly and gradually increase the intensity of the pose as you get stronger
- Be aware of your alignment and avoid overextending your joints
Q: When should I avoid the low lunge position?
The low lunge position should be avoided if you have any of the following conditions:
- Lower back pain
- Knee pain
- Hip pain
- Sciatica
Q: What resources are available to learn more about the low lunge position?
There are a number of resources available to learn more about the low lunge position, including:
- Yoga books
- Yoga magazines
- Online yoga classes
- Yoga apps
Low Lunge Yoga Pose
FAQ
Q: What are the benefits of the low lunge position?
A: The low lunge position has many benefits, including:
- Stretches the hamstrings, calves, and groin
- Strengthens the quadriceps, glutes, and core
- Improves balance and coordination
- Reduces stress and anxiety
Q: What are some common mistakes to avoid when doing the low lunge position?
A: Some common mistakes to avoid when doing the low lunge position include:
- Rounding your back
- Pressing your knee past your toes
- Overextending your neck
Q: When should I avoid doing the low lunge position?
A: You should avoid doing the low lunge position if you have any of the following conditions:
- Pregnancy
- A herniated disk
- Knee pain
Table of Contents
Maybe You Like Them Too
