
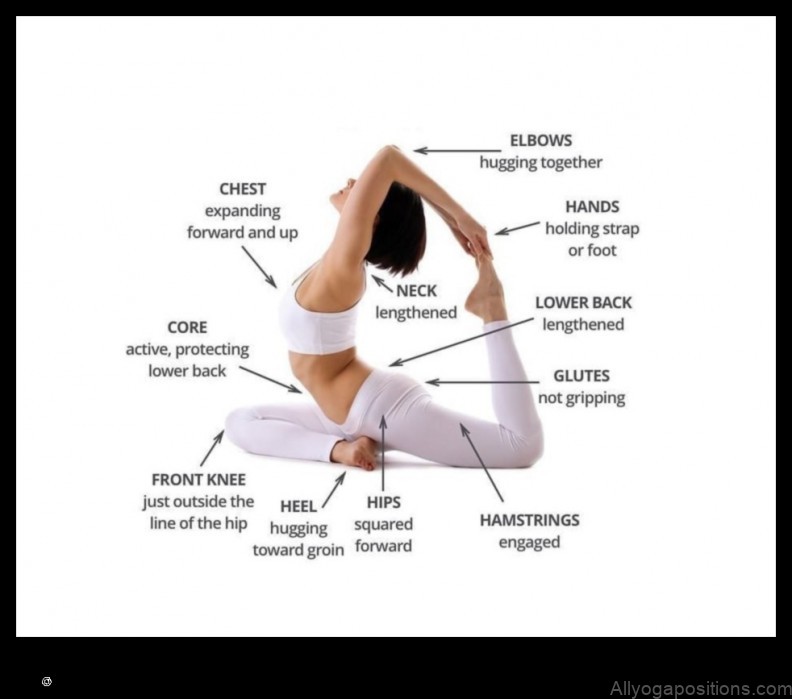
One-Legged King Pigeon Pose II (Eka Pada Rajakapotasana)
One-Legged King Pigeon Pose II (Eka Pada Rajakapotasana) is a challenging yoga pose that stretches the hamstrings, groin, and hips. It is also a great way to improve balance and flexibility.
This pose is named after the king pigeon, which is a bird that is known for its ability to stretch its legs behind its head. In this pose, you will extend one leg behind your head while the other leg remains on the ground.
One-Legged King Pigeon Pose II is a deep hip opener and can be difficult for beginners. If you are new to yoga, it is important to start with a modified version of the pose and gradually work your way up to the full pose.
Here are the steps to do One-Legged King Pigeon Pose II:
- Start in a kneeling position with your feet together and your hands on your hips.
- Inhale and extend your right leg behind you, reaching your toes towards the ground.
- Exhale and bend your left knee, bringing your left foot to the outside of your right thigh.
- Reach your arms forward and place your hands on the ground on either side of your right foot.
- Inhale and extend your torso forward, reaching your chest towards your right knee.
- Exhale and lower your torso down to the ground, resting your forehead on your shin or the ground.
- Hold the pose for 5-10 breaths, then release and repeat on the other side.
Here are some modifications for One-Legged King Pigeon Pose II:
- If you cannot reach your toes in the extended position, place a block or bolster under your foot.
- If you have tight hamstrings, bend your right knee and bring your foot to your calf or thigh.
- If you have low back pain, place a rolled-up blanket under your pelvis.
Here are some common mistakes to avoid when doing One-Legged King Pigeon Pose II:
- Don’t force the pose if you feel pain.
- Don’t lock your knees.
- Don’t let your shoulders round forward.
Here are some safety precautions for One-Legged King Pigeon Pose II:
- If you have any knee, hip, or back injuries, talk to your doctor before doing this pose.
- Listen to your body and stop if you feel pain.
- Do not do this pose if you are pregnant.
Here are some tips for getting the most out of One-Legged King Pigeon Pose II:
- Breathe deeply and relax into the pose.
- Focus on lengthening your spine and opening your hips.
- Hold the pose for as long as you comfortably can.
One-Legged King Pigeon Pose II is a challenging but rewarding yoga pose. It can help to improve your flexibility, balance, and range of motion. If you are new to yoga, start with a modified version of the pose and gradually work your way up to the full pose.
Here are some FAQs about One-Legged King Pigeon Pose II:
- What are the benefits of One-Legged King Pigeon Pose II?
- One-Legged King Pigeon Pose II can help to improve flexibility, balance, and range of motion. It can also help to relieve pain in the lower back, hips, and knees.
- When should I not do One-Legged King Pigeon Pose II?
- You should not do One-Legged King Pigeon Pose II if you have
Topic Answer I. Introduction One-Legged King Pigeon Pose (Eka Pada Rajakapotasana) is a yoga pose that stretches the hamstrings, groin, and hips. It is also said to relieve stress and improve digestion. II. Benefits of One-Legged King Pigeon Pose - Stretches the hamstrings, groin, and hips
- Relieves stress
- Improves digestion
- Increases flexibility
- Strengthens the core
III. How to Do One-Legged King Pigeon Pose - Start in a kneeling position with your feet together.
- Bend your right knee and place your right foot on the outside of your left thigh.
- Reach your left arm behind you and grab your left foot.
- Inhale and extend your left leg behind you as far as you comfortably can.
- Exhale and lower your chest to your left thigh.
- Hold the pose for 5-10 breaths, then release and repeat on the other side.
IV. Modifications for One-Legged King Pigeon Pose - If you cannot reach your foot, use a yoga strap to help you bring it closer to your body.
- If your knee is too sore, you can place a folded blanket under your knee for support.
- If you have any back pain, you can keep your chest lifted and avoid rounding your back.
V. Common Mistakes to Avoid When Doing One-Legged King Pigeon Pose - Don’t force your body into the pose if it is too painful.
- Don’t hold the pose for too long if it is uncomfortable.
- Don’t round your back or arch your neck.
II. Benefits of One-Legged King Pigeon Pose
One-Legged King Pigeon Pose (Eka Pada Rajakapotasana) is a challenging yoga pose that offers a variety of benefits, including:
- Increased flexibility in the hips, hamstrings, and groin
- Strengthened core and legs
- Improved balance and coordination
- Reduced stress and anxiety
- Improved digestion
- Increased blood flow to the brain
III. How to Do One-Legged King Pigeon Pose
To do One-Legged King Pigeon Pose (Eka Pada Rajakapotasana), follow these steps:
- Start in a kneeling position with your knees hip-width apart and your big toes touching.
- Extend your right leg behind you and place your right foot on the floor outside your left hip.
- Reach your left arm forward and place your left hand on the floor in front of you.
- Inhale and reach your right arm up overhead, extending your spine.
- Exhale and fold forward, bringing your right knee to your left elbow.
- Reach your right hand behind you and grab your right ankle.
- Inhale and extend your right leg up behind you, keeping your left knee on the floor.
- Exhale and lower your right leg back down to the floor.
- Repeat on the other side.
II. Benefits of One-Legged King Pigeon Pose
One-Legged King Pigeon Pose (Eka Pada Rajakapotasana) is a deep hip opener that stretches the groin, inner thighs, and calves. It also strengthens the back, shoulders, and ankles.
Specifically, One-Legged King Pigeon Pose can offer the following benefits:
- Increases flexibility in the hips, groin, and inner thighs
- Strengthens the back, shoulders, and ankles
- Improves posture
- Relieves stress and tension
- Promotes relaxation
V. Common Mistakes to Avoid When Doing One-Legged King Pigeon Pose
Here are some common mistakes to avoid when doing One-Legged King Pigeon Pose:
-
Don’t force your knee to go past your toes. If you feel any pain in your knee, stop and adjust your position.
-
Don’t round your back. Keep your spine long and engaged throughout the pose.
-
Don’t lean too far forward. Keep your chest lifted and your shoulders relaxed.
-
Don’t hold the pose for too long. If you feel any discomfort, come out of the pose immediately.
How to Do One-Legged King Pigeon Pose
To do One-Legged King Pigeon Pose (Eka Pada Rajakapotasana), follow these steps:
- Start in a kneeling position with your right knee on the floor and your left knee bent in front of you.
- Place your right foot on your left inner thigh, just above your knee.
- Reach your arms overhead and interlace your fingers.
- Inhale and extend your torso forward, reaching your arms toward the floor.
- Exhale and fold forward over your left leg, bringing your chest to your shin.
- Hold the pose for 5-10 breaths, then release and repeat on the other side.
VII. When Not to Do One-Legged King Pigeon Pose
You should not do One-Legged King Pigeon Pose if you have any of the following conditions:
- A herniated disc
- Sciatica
- Iliotibial band syndrome
- Pregnancy
- A history of knee or hip injuries
If you are unsure whether or not you should do One-Legged King Pigeon Pose, please consult with your doctor or a qualified yoga instructor.
Conclusion
Conclusion
One-Legged King Pigeon Pose is a challenging but rewarding yoga pose that can help you improve your flexibility, strength, and balance. It is also a great way to relieve stress and tension. If you are new to yoga, be sure to start with modifications and gradually work your way up to the full pose. With practice, you will be able to hold One-Legged King Pigeon Pose for longer periods of time and reap all of its benefits.
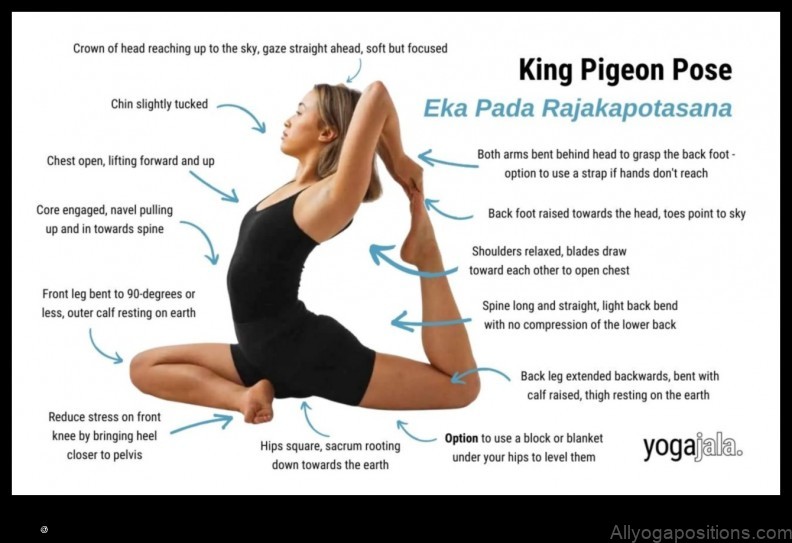
One-Legged King Pigeon Pose II One-Legged King Pigeon Pose II (Eka Pada Rajakapotasana II) is a deep hip opener that stretches the inner thighs, groin, and hips. It also strengthens the ankles, calves, and thighs. This pose is a great way to relieve tension in the lower back and improve flexibility in the hips.
To do One-Legged King Pigeon Pose II, start by sitting on your mat with your legs extended in front of you. Bend your right knee and bring your right foot to the outside of your left thigh. Extend your left leg out behind you, keeping your foot flexed.
Reach your arms overhead and interlace your fingers. Inhale and extend your torso forward, reaching your arms toward your feet. Exhale and fold forward, bringing your chest to your right knee. Keep your left leg extended and your right foot on the outside of your left thigh.
Hold the pose for 30 seconds to 1 minute, then release. Repeat on the other side.
One-Legged King Pigeon Pose II is a challenging pose, so it’s important to listen to your body and modify the pose as needed. If you have any pain in your knees, ankles, or back, stop and do not continue the pose.
One-Legged King Pigeon Pose II
Benefits of One-Legged King Pigeon Pose
How to Do One-Legged King Pigeon Pose
Modifications for One-Legged King Pigeon Pose
Common Mistakes to Avoid When Doing One-Legged King Pigeon Pose
Safety Precautions for One-Legged King Pigeon Pose
When Not to Do One-Legged King Pigeon Pose
Conclusion
FAQ
References Q: What are the benefits of One-Legged King Pigeon Pose?
A: One-Legged King Pigeon Pose can provide a number of benefits, including:
- Stretches the hips, groin, and inner thighs
- Opens the chest and shoulders
- Improves balance and coordination
- Relieves stress and tension
Q: How do I do One-Legged King Pigeon Pose?
A: To do One-Legged King Pigeon Pose, follow these steps:
- Start in a kneeling position with your feet together and your hands on your hips.
- Step your right foot forward and place your right knee on the ground in front of your left knee.
- Reach your left arm behind you and grab your left foot.
- Inhale and extend your right leg behind you, keeping your right knee bent.
- Exhale and lean forward, bringing your chest towards your right knee.
- Hold the pose for 30 seconds to 1 minute, then release and repeat on the other side.
Q: What are some modifications for One-Legged King Pigeon Pose?
If you are unable to extend your right leg behind you in One-Legged King Pigeon Pose, you can try these modifications:
- Keep your right knee bent and place your foot on the ground behind you.
- Rest your right foot on a block or chair behind you.
- Hold onto a strap or towel with your right hand and extend your arm behind you, keeping your right knee bent.
Q: What are some common mistakes to avoid when doing One-Legged King Pigeon Pose?
When doing One-Legged King Pigeon Pose, it is important to avoid the following mistakes:
- Overextending your back.
- Pressing your knee into the ground.
- Straining your neck.
- Holding the pose for too long.
Q: What are the safety precautions for One-Legged King Pigeon Pose?
Before doing One-Legged King Pigeon Pose, it is important to take the following safety precautions:
- Listen to your body and do not push yourself beyond your limits.
- If you have any pain or discomfort, stop the pose and consult with a doctor or physical therapist.
- Warm up your body before doing the pose.
- Cool down your body after doing the pose.
Q: When should I not do One-Legged King Pigeon Pose?
You should not do One-Legged King Pigeon Pose if you have any of the following conditions:
- Pregnancy
- Recent knee surgery
- Back pain
- Neck pain
Q: What are the conclusions of One-Legged King Pigeon Pose?
One-Legged King Pigeon Pose is a challenging but rewarding yoga pose
Table of Contents
Maybe You Like Them Too
- Tranquil Touchpoints Yoga for Inner ConnectionA gentle yoga practice to help you find peace and balance in your mind, body, and spirit.
- Yoga for Rehabilitation A Holistic Approach to Healing the Body
- Tolasana Yoga Pose A Guide to This Inverted Backbend
- Yoga for PTSD Recovery A Mindful Way to Heal
- Tittibhasana Yoga Pose A Guide to This Inverted Arm Balance