
What to Know Before You Begin
Now that we’ve looked at how restorative yoga can help you establish more balance in your life, it’s time to get down to the nuts and bolts of what you’ll need to begin your practice. This chapter covers everything from how much time you’ll need and how to create a supportive space for your practice to what to wear and what props you’ll need so you feel prepared to successfully begin your restorative yoga practice at home—and even feel comfortable taking public classes.
What You’ll Need
The following are the essential items for your restorative yoga toolkit so you can get started straightaway. As you’ll see, there’s no need to invest a stack of money to acquire new props and toys for this practice; in fact, you’ll likely find you already have everything you need at home.
Time
Time is probably the most precious and limited commodity you have, so rest assured you may not need to set aside as much of it as you think to benefit from the practice. Any pose in this book may be held for as few as 3 minutes, though some days your practice might mean you spend 20 minutes in Basic Relaxation Pose . When you only have 5 minutes and you’ve been on your feet all day, spend them in Legs Up the Wall . When you have more time, follow a full sequence for sustained relaxation. You can practice restorative yoga at any time of the day when it works for your schedule.
A full yoga sequence leaves you feeling completely replenished for hours, or even days, so a good goal is to aim for an hour-long practice once or twice a week, then top up with short mini-sequences as you have time. And don’t worry—there’s no such thing as doing too much restorative yoga!
Space
The next thing to consider is space. Like time, you really don’t need much of it. You can set aside an entire room or just one corner of a room. Unroll your yoga mat and lie on it to make sure you have enough room to stretch your arms up overhead and roll over onto one side without bumping into anything.
It’s helpful to keep the space you practice in clean and tidy so you’re not distracted by things you feel you need to clean up and organize. It should be quiet, warm enough to stay comfortable, and somewhere your kids and pets won’t start climbing all over you the moment you lie down. Dim the lights and turn off all electronics to avoid disruptions. Feel free to set a relaxing tone with essential oils, candles, or soothing music.
If you’re planning to practice at work, find the quietest, most distraction-free space available; ideally an office or room with a door you can close for privacy.
Clothes
There’s no special uniform or new wardrobe items you need to purchase to practice restorative yoga. You simply want to be comfortable and warm enough, as your body temperature tends to drop by a degree or two when you’re resting. I encourage my students to dress in soft, loose, comfortable layers, and yes, that includes pajamas. As a general rule of thumb, wear loose-fitting pants, socks, and long sleeves that can be removed if you get too warm. Avoid tight-fitting clothing that restricts movement or breathing, itchy fabrics, and annoying zippers and fasteners. Comfort is the name of the game.
Props
An essential component of any restorative yoga practice, props serve the important role of supporting you so your muscles can relax completely. However, you don’t have to purchase lots of expensive new yoga props to begin. In fact, you can easily use items you have around the house. In this section, you’ll see that props are divided into “essential” items that you likely already have, and “nice-to-have” props that you may choose to buy. (See here for recommendations on where to buy props.) Here, you’ll learn how to fold blankets and create your own props.
Essential Props
This is a list of items you likely have around the house. Remember, you can do an entire restorative yoga practice with only these props.
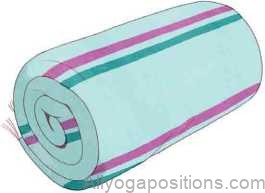
- Yoga mat and a blanket to lie on (or 2 blankets)
- Blanket to cover yourself
- 1 to 3 additional blankets (or large bath towels) to build bolsters
- 2 yoga blocks (or large hardcover books)
- 1 or 2 bulky pillows from your bed (or cushions from your couch)
- Medium bath towel you can use as a pillow with neck support
Small towel or washcloth to cover your eyes
Chair without wheels (optional; for use with chair poses)
Nice-to-Have Props
If you’re interested in acquiring some specialized restorative yoga props, here’s a list of items that would be a great place to start.
- 1 or 2 rectangular bolsters (approximate dimensions: 25” L x 6” H x 12” W)
- 1 round bolster (approximate dimensions: 28” x 10”)
- 1 pranayama bolster (this can be used in place of a blanket roll in many postures; approximate dimensions: 25” L x 6” H x 3” W)
- 2 to 4 yoga blankets or traditional Mexican blankets (approximate dimensions 73” x 48”)
- Eye pillow
- Neck pillow
- Yoga sandbag (approximately 7 to 10 pounds, these can be placed on any body part to add weight and augment the sensation of grounding and relaxation)
- Yoga strap
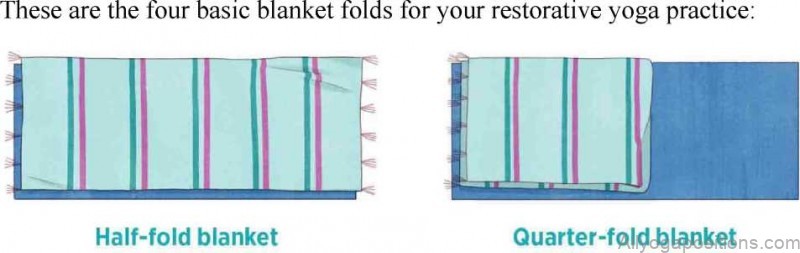

Square eighth-fold blanket
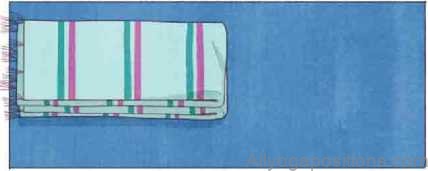
Long eighth-fold blanket
Using these, you can easily make the following props:

• Make your own bolster. Take 2 half-fold blankets, lay one on top of the other, and roll them up starting at the narrow end. To make a larger bolster, use 3 blankets.

Make your own blanket roll. Take one quarter-fold blanket and roll it up along the long edge to make a long, thin tube.

• Make your own neck pillow. Take one eighth-fold blanket and place it under your head, then roll up the end closest to your neck until it fills the gap between the back of your neck and the blanket.
Making Progress
The beauty of restorative yoga is that it’s not about progressing to more advanced postures but becoming more fluent in the language of relaxation. In fact, although at first you may be curious about trying all the poses in this book, over time you will come to learn what is most effective for your body and you may find you experience deep relaxation practicing just a few poses. To that end, forgo poses that don’t feel relaxing to you—that’s okay.
If you’re entering into this practice with injuries, please follow the instructions to use more or less support as needed so you don’t worsen your symptoms. There’s no benefit to pushing through pain or discomfort here. Remember, the journey is the practice; we’re not trying to get to a particular destination. This is a practice of finding what works for you and doing it until it becomes a healthy habit.
Taking Classes
Today there are many restorative yoga classes offered from basic sequences to specialized classes that use music, aromatherapy, Reiki, and other complementary practices. If you’re curious about taking restorative yoga classes, they can be a great way to supplement your home practice. Once you feel comfortable, you might find that taking a class allows you to feel even more supported and relaxed as the teacher handles all the planning. A good teacher may even offer guided visualizations, meditations, and breath work to enhance your journey.
Before taking a class, reach out to the studio or gym to ensure that the class is a true restorative yoga class, as some may actually be a slow-flow class and an entirely different experience. Some teachers offer hands-on assists, so if you are not comfortable with this, let them know in advance.
A Note to Teachers
- As a teacher, you may use this post for your own personal growth or to help you plan your own restorative yoga class sequences. If you work with older students or those dealing with injuries or illnesses, this practice can be an extremely powerful addition to your class roster, helping you connect with your students and offering them a pathway to healing.
- If you think your community might be hesitant to try restorative yoga, adding one to three restorative poses at the end of a more physically challenging practice can be an effective way to introduce your students to the benefits without them having to commit to a full hour. I suggest beginning with Basic Relaxation Pose , Heart Pose , and Supported Child’s Pose .
- You may have to get creative if your studio or gym lacks props, but remember that yoga mats can be rolled up to create bolsters and towels can be used as blankets and pillows.
- Finally, restorative yoga is extremely popular when offered as a special class or workshop. Because your students spend so much time in each pose, this presents a great opportunity for you to guide a special theme (like “writing” a story of self-compassion to replace a narrative of self-doubt with positive intentions), or to weave in your knowledge of subjects such as yoga mythology or the chakras.
Forming a Habit
Although there are no official guidelines for how often you should practice, studies suggest that the more regularly you practice yoga and meditation, the greater the benefits. However, forming new, healthy habits can be challenging: You’re busy and, likely, hard-wired toward instant gratification —and healthy habits don’t always deliver immediate results. For help with overcoming this hurdle, we can turn to James Clear, author of Atomic Habits , and these five helpful tips of his:
- . Start small. Practice for 20 minutes in Basic Relaxation Pose once a
week.
- . Increase slowly. After a couple of weeks, progress to 30 minutes,
adding another posture or two.
- . Break it up. As the time increases it’s helpful to break it up into
chunks. Once you hit 60 minutes, split the time into two 30-minute practices.
- . Plan for failure. You will miss a practice and, when you do, just return
to it as quickly as possible. Missing a practice won’t detract from your overall progress.
- . Practice patience. Like any new habit, restorative yoga gets easier the
more you do it.
Dos and Don’ts
Keep these basic tips in mind to keep your practice on the right path.
Do:
Designate a self-care day. If you feel overwhelmed with incorporating another thing into your weekly routine, set aside one morning or one evening a week to enjoy all your self-care rituals.
Reward yourself. A study from Iowa State University suggests that adding a motivating reward, such as a bite of chocolate, after your practice is key to making your habit stick.
Identify barriers to your success. It’s helpful to understand why you’re struggling with consistency. Is it a lack of time? Start with 10 minutes. An issue with space? Create a designated restorative yoga area at home. The absence of motivation? Invite a friend to come to a class with you.
Don’t:
Set unrealistic goals. If you’ve never done yoga before, there’s no need to make a goal to practice for an hour a day. You may get busy and miss a day of practice and feel like you’ve failed yourself. Start small.
Lose yourself in self-doubt. It’s normal to feel daunted by new things. Just remember, everyone can lie down and that’s precisely where we start. Next, you can focus on becoming the pilot of your mind rather than the passenger.
Worry that you’re being selfish. Self-care can be unfamiliar terrain and, sometimes, you can mistake it for self-indulgence. But without it you grow depleted, short-tempered, and impatient with others. Think of restorative yoga as the gift you give to everyone you meet.
Did you know the brain waves you experience in conscious
relaxation are different from sleep?
Theta brain waves are associated with daydreaming and REM sleep during which we experience rapid eye movement and dreams that can trigger stress. Delta brain waves are associated with deep, dreamless sleep. In practices such as restorative yoga, you experience alpha brain waves, which are associated with deep relaxation and are believed to serve as a bridge between conscious thinking and the subconscious mind.
Table of Contents
Maybe You Like Them Too
- Tranquil Touchpoints Yoga for Inner ConnectionA gentle yoga practice to help you find peace and balance in your mind, body, and spirit.
- Yoga for Rehabilitation A Holistic Approach to Healing the Body
- Tolasana Yoga Pose A Guide to This Inverted Backbend
- Yoga for PTSD Recovery A Mindful Way to Heal
- Tittibhasana Yoga Pose A Guide to This Inverted Arm Balance